Register Information & Printing Settings
Register Information
This is where you would need to go for basic settings on how your register works - such as name, status, and workflow.
1. Under Sites from the Kounta Back Office, select Devices
2. Select cog icon beside the name of the register you want to configure
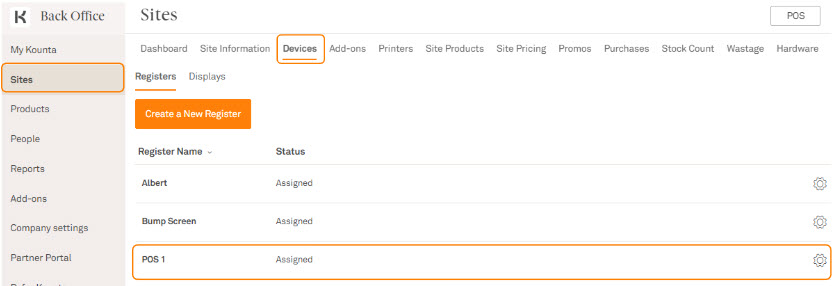
Below are the settings you can access from here.
Register Details
Terminal Name - This is the name used to identify the register, example: Front Bar.
Site - This is the Site or store the register will be associated with.
Sales Prefix - All Sales recorded through this register will be appended with this prefix. Example SP-1, SP-2 growing incrementally for each sale within a day.
Return Prefix - All Returns recorded through this register will be appended with this prefix. Example RP-1, RP-2 growing incrementally for each return within a day.
Register Status - This will indicate if the Register profile is assigned to a device or not.
If you wish to link this register profile to a different device, you would first select the Unassign Register button to release this register profile.
If you wish to link this register profile to a different device, you would first select the Unassign Register button to release this register profile.
Register Options
On-Screen Keyboard - Here you can activate the Kounta keyboard if you are using a device which does not have its own on-screen keyboard (Touch Screen PC).
Cash Options on this Register - You also have the option to Enable/Disable the Fast Cash button on the POS. The Fast Cash button is used to indicate the sale as Cash and does not show calculate change. You can also enable and disable cash payments on the register here.
Automatically Log Out of POS when inactive - This option allows you to select if the POS user is logged out after a certain time of inactivity. This can range from 15-45 seconds or never.
Customer Receipt Printing - This option allows you to configure if you want Kounta to ask you to email and print receipts, print receipts automatically, or do nothing
Signature, Tipping and Merchant Copy - You have the option to choose where Merchant Receipts will print from and where customers can tip and sign from.
Show Tip and Total Line - You have the option whether or not to show a tip and total line on Subtotals.
Show Signature Line - You have the option whether or not to show a signature line on Subtotals
Product Search on POS - You can choose which screen you want to land on after adding a product to order from the search screen
Register Workflow
These settings allow you to customise what your staff are shown on the POS. You are able to set a custom page for the start of a new sale as well as the conclusion of a sale.
As an example, you can set the register to return to the Tables page at the end of each sale. This will vary depending on your sales process.
You can refer to a separate guide on establishing register workflow to help you in customising yours.
Register printer settings
This is where you can review or change the printer settings specific to each register.
Note - These register printer settings are only one of the steps of setting up printers. If you haven't set up your printers yet, please refer to this guide on choosing the best printing method for you.
1. On the same Register Information page of the register you are configuring, select Printers

You will be taken to this page. You will find a description of these settings below the image:

Printing Method - This will dictate how the register processes its printing tasks. This method should match all other registers as well as your production printing method. Each site will only ever operate on 1 printing method.
Printer Server URL - This setting will only be relevant if you've chosen Intelligent Print Server in the previous setting. This field contains the IP address of your intelligent printer.
Receipt Printer - You can select from a drop-down list all available printers configured for your site. The selected printer will be used whenever a receipt is printed.
Cash Drawer - If you require this register to kick a cash drawer as part of transactions, select a printer from the drop-down list which has a cash drawer attached.
Production Printer Settings - This will show if your plan includes register specific production printing and you have the add-on enabled.
Related Articles
Printing Customer Receipts
Before you begin Make sure you've connected your printer before doing any of the following settings. Print subtotal for the Current Sale Similar to a receipt, the subtotal shows the total of the order. 1. From the Point of Sale, select the cog ...Intelligent Printing - Choose and Setup Hardware
If you’re reading this, you’re looking to set-up Intelligent printing, because your Kounta site is using one or more Windows, Mac, or Albert devices at the POS. The Epson TMi Intelligent Printer will allow you to immediately print receipts, pop ...Setting up Production Printing (aka Kitchen Printing)
Before you begin Naturally, before we set up production printing you will need to have set up your printers or set up your Bump Screen. Note: Bump Screens are the digitized version of kitchen printing. When you enable the Bump Screen addon it ...Lightspeed App Printing
Choosing a printer The Lightspeed App printing method allows your iPad or Android Tablet/ Mobile to communicate directly with compatible Epson or Star (iPad App only) ethernet printers. Epson TM-M30 Ethernet TM-T82II Ethernet TM-T82III Ethernet ...How to search for printers in Kounta
Connect printers to your Kounta POS 1. Head on over to your POS on the Kounta App 2. From menu, select Printing 3. The system should immediately start searching for your printers - hang tight. If not, select Search for Printers Again 4. This will ...