Stock transfers: reduce wastage by sharing inventory with other locations
You will need:
- A Purchase Advanced plan for all participating sites
- Your inventory items added from the Back Office
- A Produce Advanced Prep plan for the central production facility to transfer products you make
Send a stock transfer
Create a draft
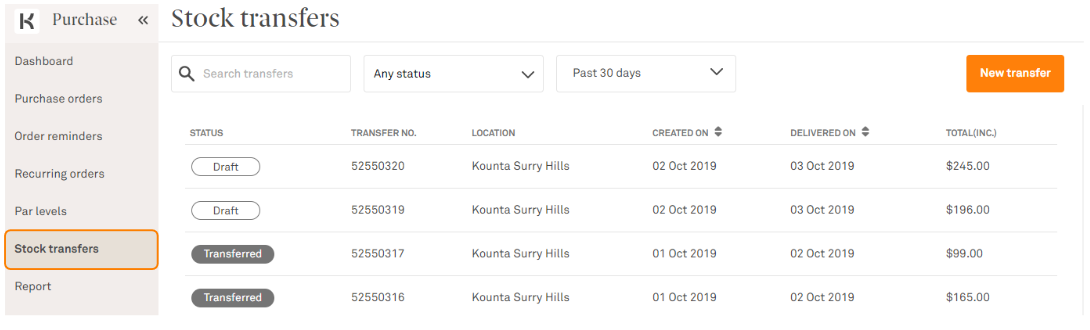
1. Launch Kounta Purchase then go to the Stock transfers tab.
2. Select New Transfer from the upper right side of the screen.
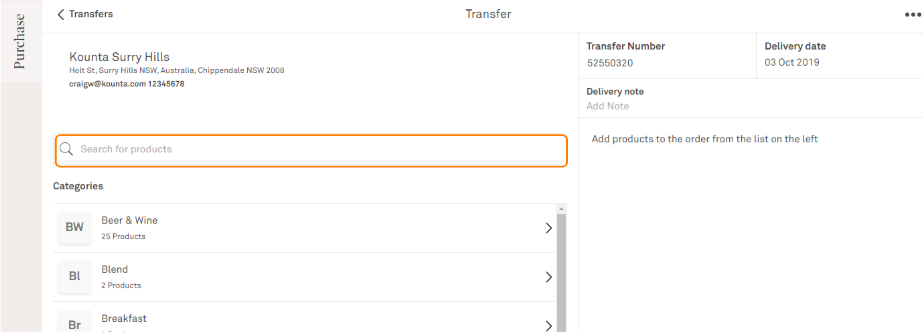
3. Select the site you would like to transfer stock to.

4. Select a category to view the products. You can also look for any category or product using the search bar.
6. Enter the quantity of the stock you would like to send in the box before the product name. (see image below)
7. On the same page, you can view and/or edit further details about your stock transfer - such as the ones described below the image.
7. On the same page, you can view and/or edit further details about your stock transfer - such as the ones described below the image.
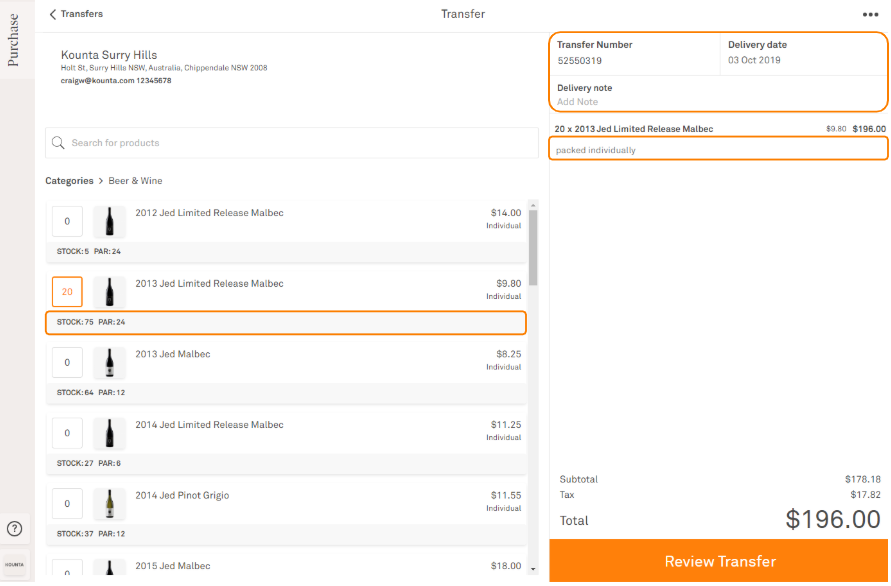
Stock & Par - Below each item, you will see your stock level and par level. Your stock level is updated based on your inventory settings. As for the Par level, you need to first set up your par level for a number to appear here. A dash will appear if this is not set.
Transfer Number - This is an automatically generated number for your stock transfer.
Delivery Date - By default, this shows the date tomorrow. Edit the date by selecting this field.
Delivery Note - Here's where you can jot down more information about the whole transfer.
Note (below product line) - You can also add notes for individual products. In the image above, there’s a note on the first item saying “Packed individually” - this was added by selecting the product and entering this on the Note field.
8. If you would like to review the PDF of this Stock Transfer, select the menu icon (three dots) on the upper right corner of the screen. Then, select View as PDF
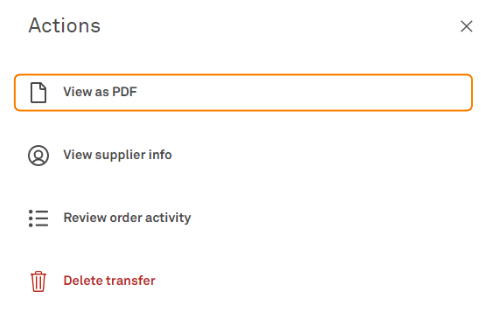
Note - If you need to edit anything, select the back arrow - this is the last stage where you can edit.
9. Once you are happy with your stock transfer details, select Review Transfer on the bottom right of the screen.
Send the stock transfer
When you send the stock transfer, it will not only send an email, it will also go to the recipient’s Kounta Purchase under the Stock transfers tab.
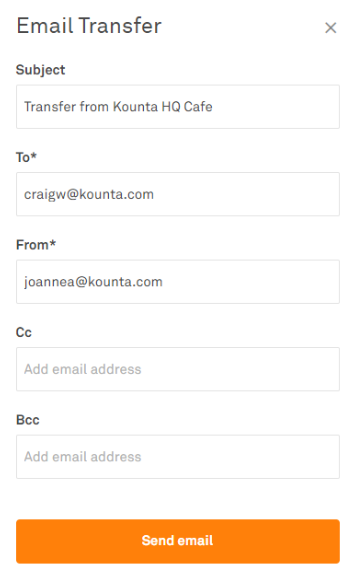
10. From the page of the draft you are making, select Send transfer.
11 Check the details auto-filled in the subject line, “To” field, and “From” field in the following dialogue box. You can edit these fields. You can also add email addresses in the CC and BCC fields.
Note - The “To” field is the email of the stock transfer recipient. The site owner is also automatically added to the “To” field once the email sends. Meanwhile, the “From” field is your email (the user signed in to Kounta Purchase). This same email will be automatically cc’ed.
Note - Even if you choose to skip sending the email, the stock transfer will still appear in the recipient’s Kounta Purchase under the Stock transfers tab.
12. You will be notified that the email was successfully sent.
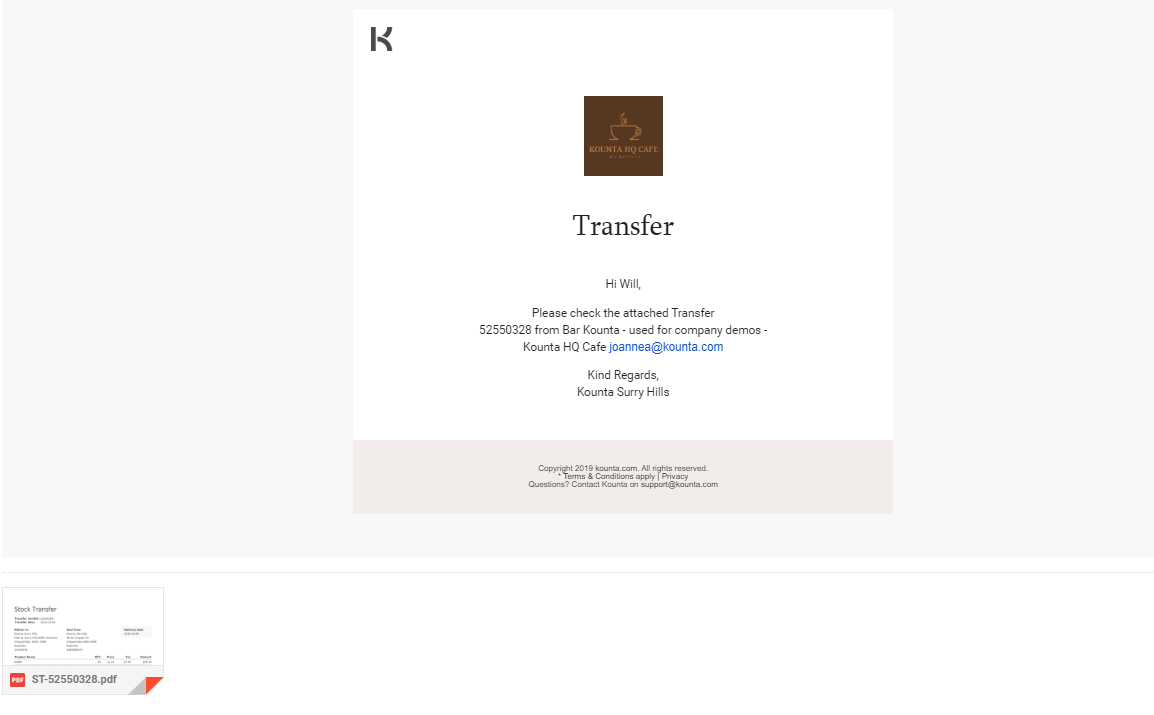
13. This will send an email to the recipient site, to the email entered in the “From” field, and to the site owner. The email contains a message, the stock transfer attached as a PDF, and your site logo,
Receive the stock transfer
If you are the recipient of the stock, you can receive the items by following a few easy steps. After receiving, Kounta will automatically update your stock levels for you.
1. Head over to the same Stock transfers tab where stock transfers are sent from.
2. Select the stock transfer you are receiving - it should have a status saying “Incoming” and contain the name of the sender site. Once open, select Start receiving.
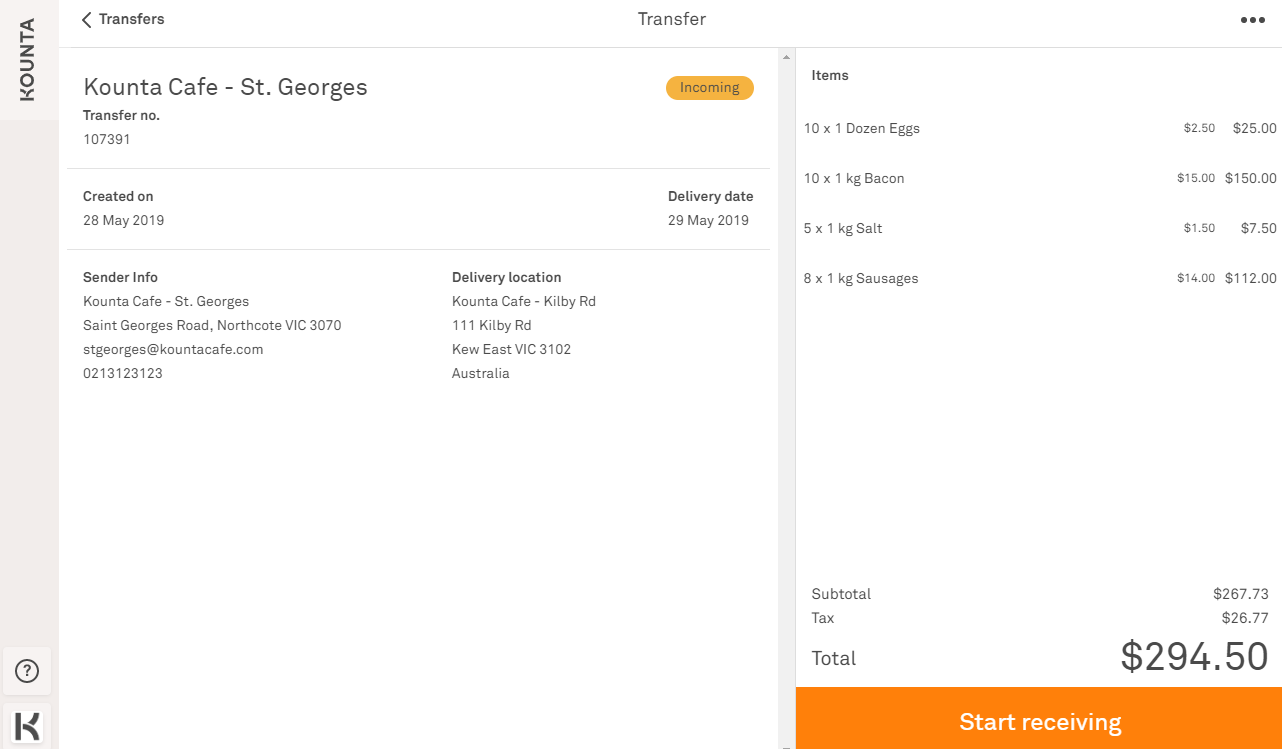
3. Check the details of the stock transfer. If you receive the wrong amount or quantity, here are your options:
In case you receive a different amount/price than originally meant for sending, select the item from the summary to note the changes.
The search bar is also available if you need to enter additional stock items that got transferred but weren’t in the original transfer.
You can also add notes to the received items like below, we noted “Deducted 1 carton that got damaged - see attached photo” for the first product
For easy documentation, you can attach photos and PDF files to the stock transfer - as proof of delivery, damaged goods, or wrong/additional items. Simply select Add PDF/Image.
Note - If you are using Kounta App, you’ll be able to upload a photo straight from the camera of the device.
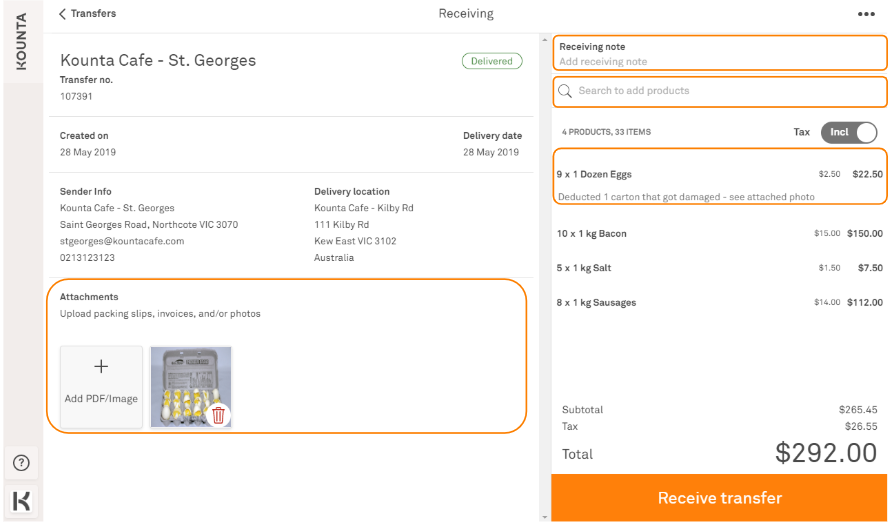
4. Select Receive transfer to finalise the stock transfer.
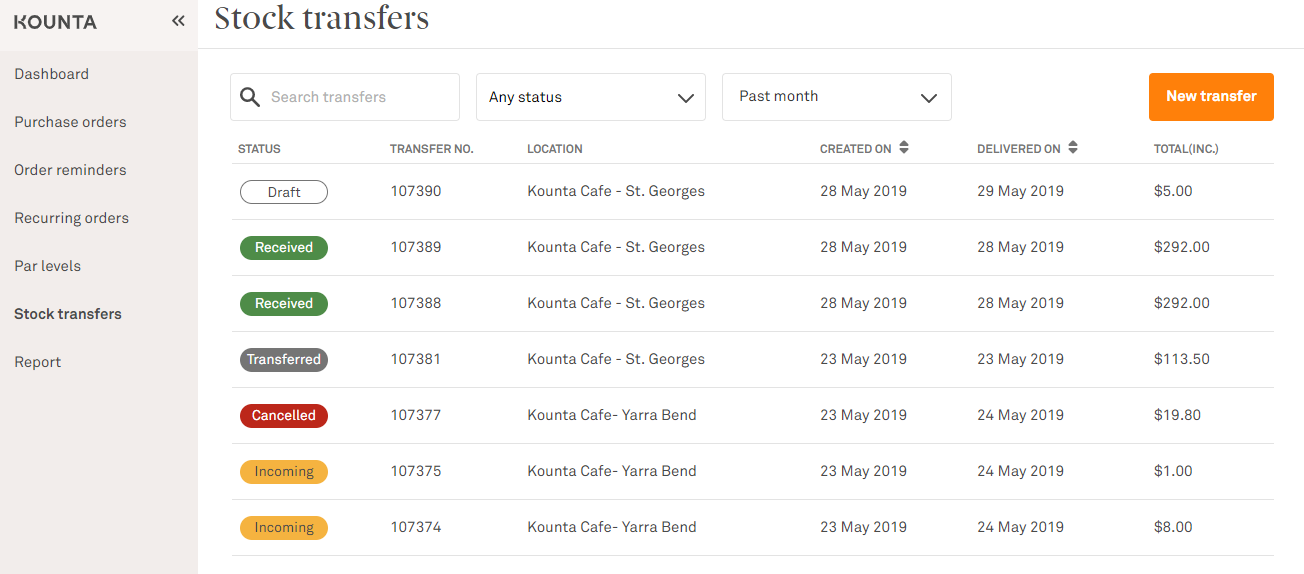
The status of the transfer will be updated like in the image below. This is viewable in the same location, the Stock transfers page

Note - If you’ve been sent products or inventory that are not enabled for your site, these products will be automatically enabled after you’ve received them.
Review Past stock transfers
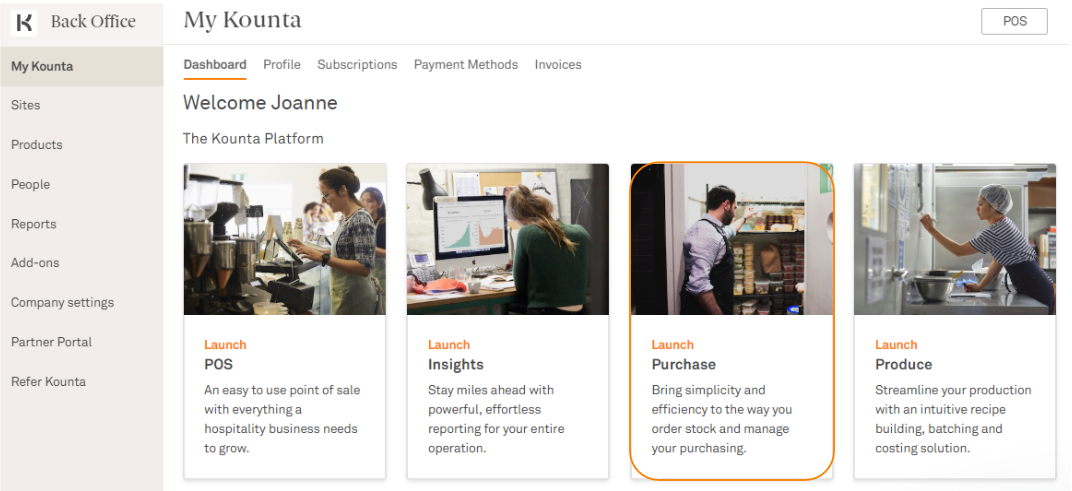
1. From the Dashboard in Back Office, select Launch Purchase.
2. Select Stock transfers.
On the following page, you can see an overview of all stock transfers and their statuses. Senders and recipients have a different set of statuses they can see.
Step 1:
Draft - Senders see this status once the stock transfer they’re creating has been saved as a draft.
Step 2:
Transferred - Senders see this status once they’ve sent the stock transfer. Even after the stock transfer has been received, this will be the status that the sender will see.
Incoming - Recipients see this status once the sender has sent the transfer - this is at the same time the email is sent to the recipient.
Step 3:
Received - Recipients see this status once they have marked the Incoming items as received.
Note - Senders at this stage will still see Transferred unless the recipient cancels.
Cancelled - Both recipients and senders see this status if an Incoming transfer is cancelled by the recipient.
Frequently Asked Questions
How do I cancel an incoming stock transfer?
Simply select the incoming stock transfer. Once it opens, select the menu button on the upper right corner - you will find an option to cancel the transfer.
Only Incoming stock transfers can be cancelled.
Can I request from a sender to give me certain inventory items?
For now, you can only send the stock transfer as a sender of the inventory items.
What if I receive less than or more than the items on the stock transfer sent by the sender?
As you receive items, you will have the option to change the quantity of received items. In fact, in case you receive other stock items from the sender site, you can also add them using the search bar.
Can I view reports of my stock transfers?
Not at the moment, but stock transfer reporting will soon be available from Kounta Insights and Back Office Reports - so stay tuned!
Related Articles
Tracking Wastage
Staff error, food sent back to the kitchen, expired ingredients, missing stock items, unsold inventory - there are various reasons why wastage happens. The first step to managing wastage is to know the full story. Empower your staff to record how ...Adding your inventory items to Kounta
Before you begin Make sure that you have enabled any Produce plan first to be able to see and edit your products inventory settings. Add stock items You add stock items the same way as adding normal products into Lightspeed Kounta. But here’s ...Setting up Recurring Purchase Orders
Before you begin You will need: - Kounta Purchase enabled from Back Office - with an Advanced Kounta Purchase plan - Have your suppliers added in Kounta - Follow along with the guides linked above before proceeding to the next stepsStocktaking with Lightspeed
What gets measured gets managed. Effective stocktaking will give you visibility on where your purchased goods go - how many are used, lost, stolen or wasted. Enable the Stock Counts feature 1. Select Features in Back Office 2. Choose Stock ...Sync Purchase Orders to QuickBooks
Before you begin Before you start connecting your QuickBooks account to Kounta, you'll want to make sure your QuickBooks account set up - you may need to double check this with your Accountant, or Bookkeeper. From here you can then you'll need to ...